Influences behind the poster
Before I start sketching a new painting or graphic work, I always try to narrow down my influences to a few illustrations or pictures as possible. With Voodoo Night Horror poster, I had two key influences: a real Voodoo fetish market which is located in Lomé, capital of Togo, a country located in West Africa (see the Wikipedia article about the Akodessawa Fetish Market here).
The other key influence were a couple of low budget horror films produced by Hammer Film Productions in the 1960s: Plague of the Zombies (1966), Stranglers of Bombay (1959) and a Hammer House of Horror TV series episode “Charlie Boy” made in 1980. Plague of the Zombies and TV episode “Charlie Boy” have a clear, voodoo influenced plot and Stranglers of Bombay is a film about evil Thuggee cult worshipping goddess Kali and strangling people during the 1830s in colonial India.

Akodessawa Fetish Market


Transferring the finished line sketch to a gessoed board
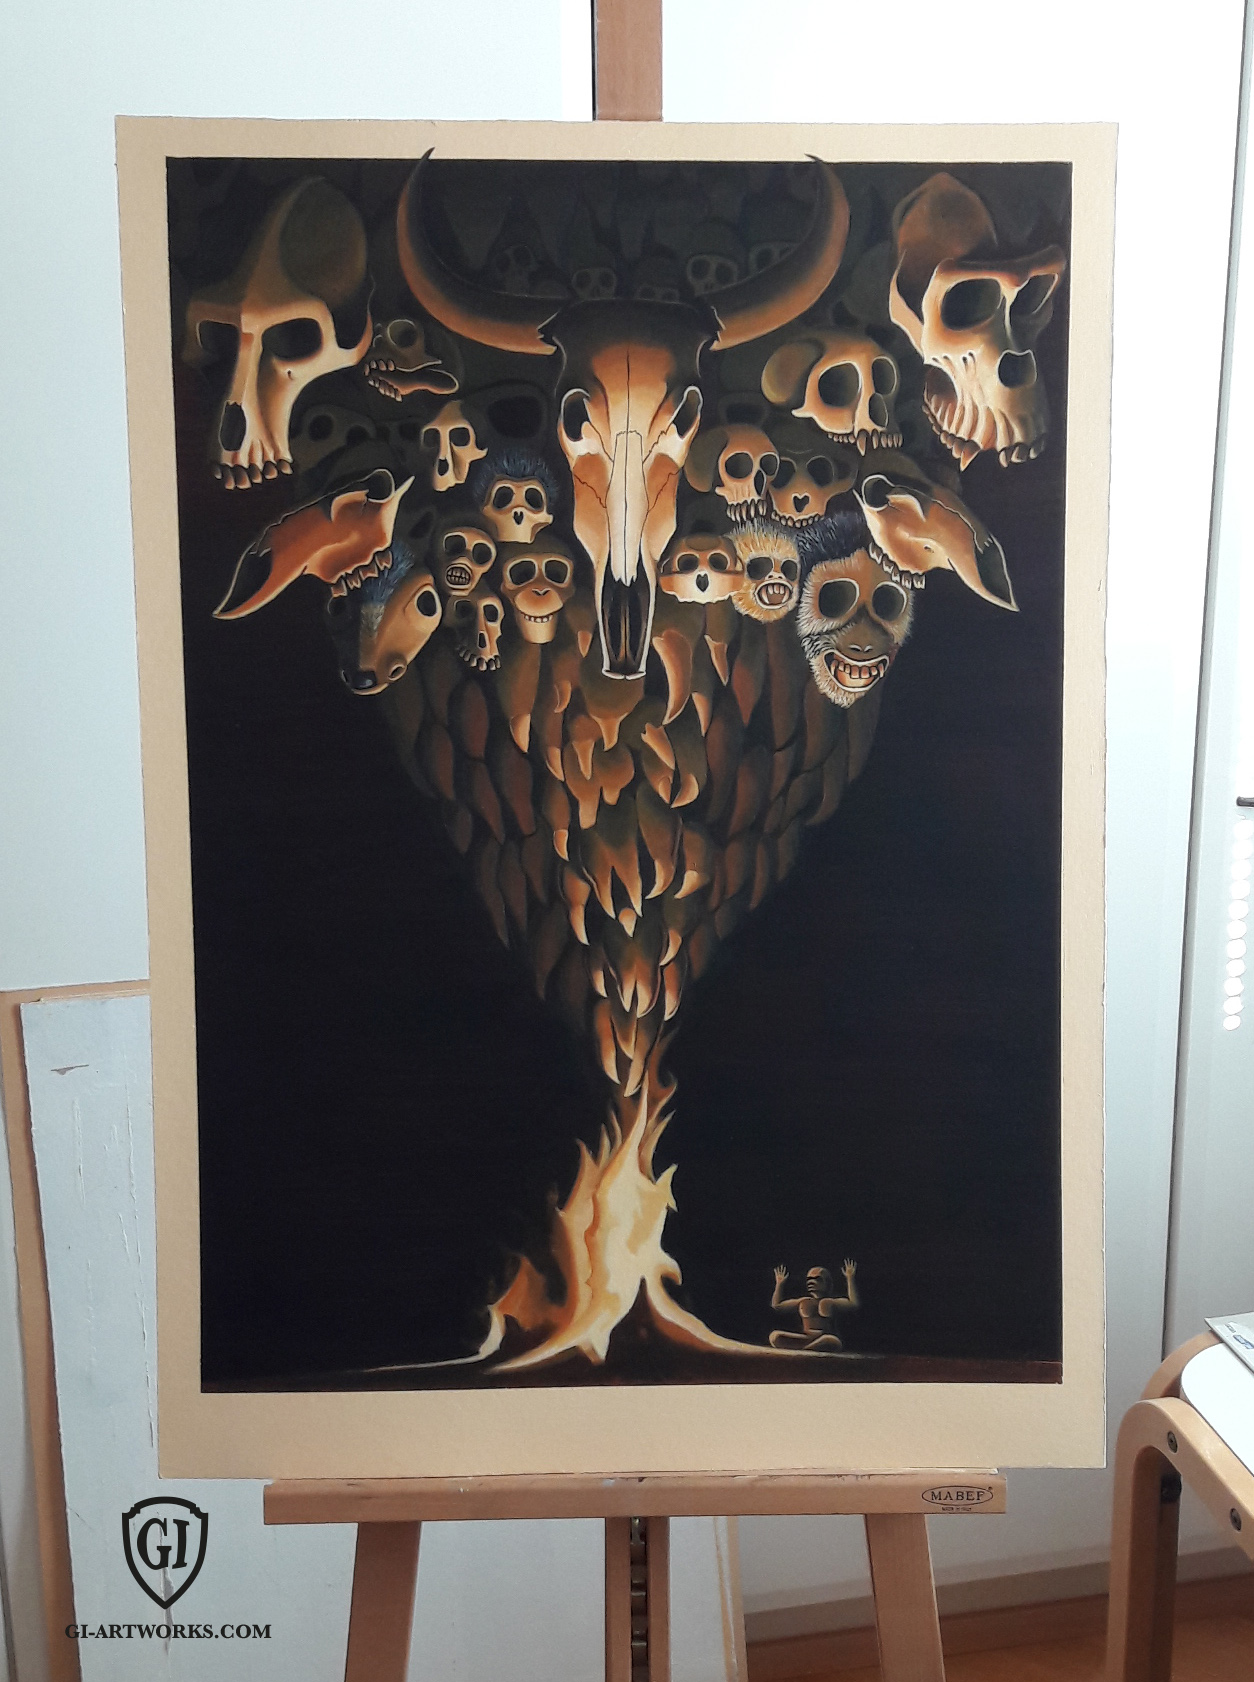
After I had finished gessoing the hard cardboard illustration board, I divided the surface carefully into equally sized sections. Then I started to draw skulls with graphite pencil from the biggest skulls on the corners proceeding to smaller ones in the center. This line drawing phase took about one week to complete. Then I erased the straight lines before applying first layers of paint.
Before I started to apply first layers of paint, I masked certain areas with two different tapes (KleenEdge and M3 Removable Magic Tape) to avoid paint blocking details in the drawing. I used Quinacridone Gold paint (part of Windsor & Newton Artists’ Acrylic range) to block white areas away. Then I mixed black with Quinacridone Gold to achieve the proper black level I wanted. The skulls and the witch doctor are lit by a bonfire thus making these areas to appear in more light than the surroundings which are meant to be pitch black.


Modeling skulls
The cloud of skulls needed more structure and definition before I started to paint them in more detail and correct lighting. I added more black in the eye sockets and on top of the skulls as well. Then I added more contrast to the flock of birds right underneath the cloud of skulls.


and darkened eye sockets as well
Painting the three big skulls
I started to paint the biggest skull located in the middle. I used big tone approached to paint the skull: from darkest cast shadows to highlights. Then I added all the details including the cracked lines and “the glowing” in the eye sockets. When I finished the skull it served as an reference (the direction of light, casting of the shadows, details, colour scheme etc…) to other skulls that followed. I had some trouble to understand the plane changes on the baboon skull (located on the left upper corner). I just couldn’t find any good baboon skull pictures on the net for reference.


Painting smaller skulls
The horse like skulls in the far left and far right belonged to a pair of Red deers. These two skulls differed remarkably from others skulls in the painting. They were more difficult to paint because of the unusual elongated shape and structure. With some of the ape skulls, I wanted variation and added some hair to make them standout even more from the mass. And to be honest, make them appear more freaky and disjointed. I used swift, fast and sharp brush strokes to achieve “loose” hair effect.


The Flock of Birds
I didn’t want to paint the birds with much detail. They had to be a secondary mass when compared with the skulls above. This decision was based on the hierarchy of details which is essential when trying to make a successful painting or a drawing. Before I started to paint this poster, I did a tonal plan (a sketch with lighting coming from below) to see in advance how to paint the different objects in it. Only the middle section is properly lit and everything else stays in the shadows.


The Bonfire and the witch doctor
These two were the last objects I painted for the project. The bonfire’s first version was way too stiff to be a believable fire. I left a couple of “mistakes” to be seen on the left side of the bonfire to add some transparency to the flames. Witch doctor was pretty straightforward object to paint. First I blocked the shape with darkened Naples Yellow. I wanted the witch doctor’s face to remain in shadows and to add more mystery to his character. I didn’t want to add any significant details to the witch doctor character because he only serves as a balancing object on the right side of the bonfire.


The finished painting
If you want to know more about the process or share your thoughts, just leave a comment below.
